Páginas

quinta-feira, 26 de abril de 2012

como fazer caleidoscopio


Faça você mesma: caleidoscópio

O objetivo aqui é usar um caleidoscópio como Save the Date. A ideia é diferente, criativa e fica a cara dos noivos, pois as cores poderão ser escolhidas de acordo com suas preferências ou seguindo o padrão de papelaria do casamento.
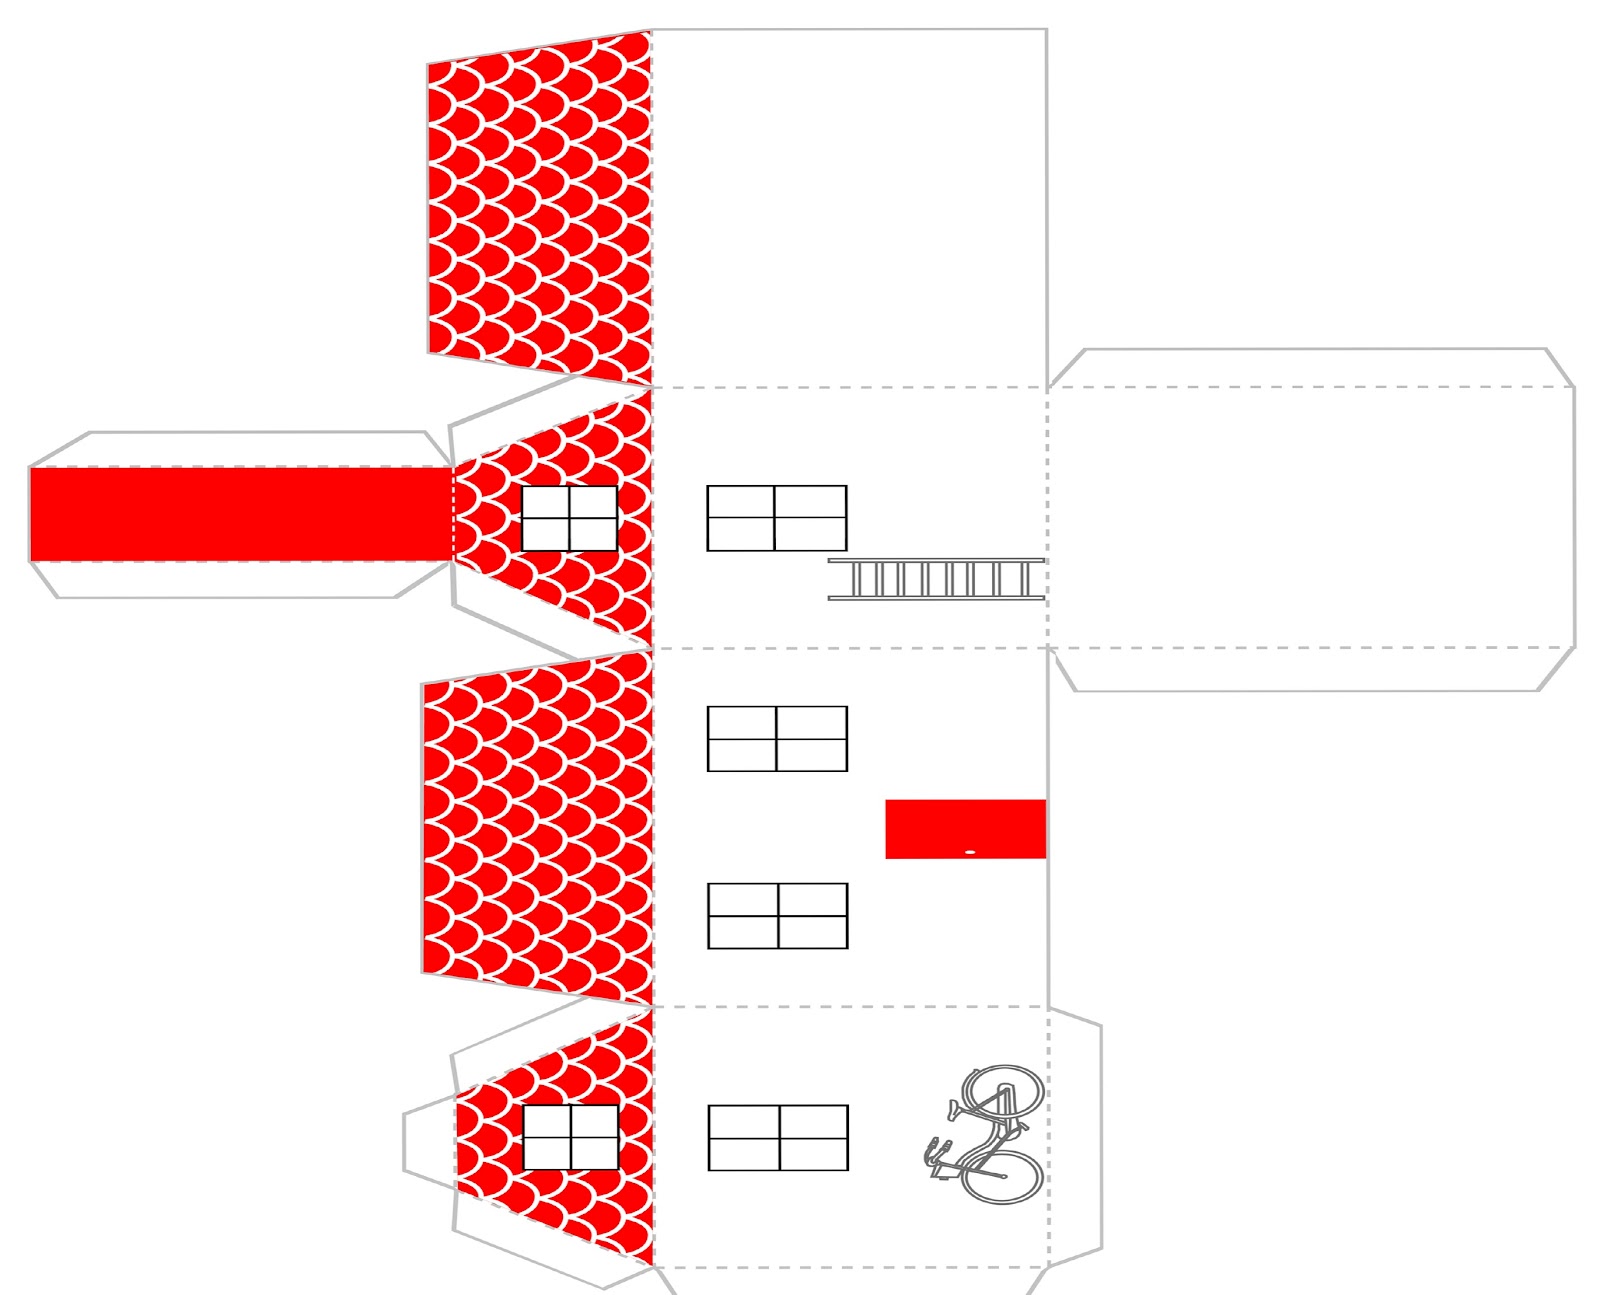
O primeiro passo é montar o caleidoscópio. Você vai precisar de três espelhos retangulares, um tubo de PVC (pode ser qualquer outro material), uma tampa escura e uma tampa transparente (pode ser de plástico ou de papel). Os espelhos devem ser inseridos no tubo no formato triangular, com a face que reflete voltada para o centro. De um lado, posicione a tampa escura, com um buraco para visualização, e, no outro, a tampa transparente, onde serão criadas as formas coloridas.
Não entendeu nada? Veja o esquema abaixo:
Com a estrutura do caleidoscópio montada, é hora de personalizá-lo! Escolha suas cores preferidas, pique pedacinhos de papel (podem ser usados perfuradores com formato de coração, estrela etc.) e coloque dentro do tubo – se preferir, você também pode usar confete.
Junto com os papéis, coloque também a data do casamento, fixada com cola na tampa transparente – os papéis em formato de número podem ser comprados em lojas de scrapbook.
Em seguida, cubra o cano com um tecido ou papel de sua preferência. Pode ser usado, por exemplo, o padrão do seu convite de casamento.
Por fim, coloque em cada caleidoscópio uma etiquetinha com os nomes dos convidados.
Pronto, você tem um caleidoscópio personalizado! Seus convidados vão adorar!

Padronize!

Padronize!

tulipas de tecido


Faça você mesma: tulipa de tecido

Eu adoro tulipas de tecido!
Primeiro, porque ficam lindas e são extremamente versáteis – combinam com absolutamente qualquer decoração. Segundo, porque permitem que a família (no meu caso, minha mãe) se envolva nos preparativos da festa. E, terceiro, porque sou defensora do “faça você mesmo”: viva a exclusividade!
No meu casamento, usei as tulipas de tecido para enfeitar meus bem casadose, um ano depois, fiz o mesmo nas minhas bodas de papel. Nos dois eventos, minha mãe fez 200 e 35 tulipas, o que levou 10 e 2 dias, respectivamente. Enquanto por aí cada tulipa custa até 3 reais, fazendo em casa, gastamos cerca de 10 centavos.
Apesar de nunca termos usado molde ou seguido quaisquer instruções (a fabricação saiu toda da nossa cabeça), acho que o processo funcionou muito bem; foi prático, rápido e barato. Por isso, resolvi criar, finalmente, um passo-a-passo (meu primeiro DIY!).

Passo-a-passo da tulipa de tecido

Materiais
- Tecido
- Manta acrílica
- Palitos de madeira
- Papel ou tecido verde
- Tesoura e cola
- Linha e agulha
Sempre que preciso de tecidos estampados, procuro na Marry Tecidos (Taguacenter). A loja é grande, tem muitas opções e o metro custa R$14. Também no Taguacenter, é fácil encontrar a manta acrílica. Os palitos de madeira, por sua vez, podem ser aqueles de churrasco, vendidos em supermercados.

Corte o tecido em retângulos de 6x8cm – esse é o tamanho adequado para que as tulipas fiquem proporcionais aos bem casados. Em seguida, com o tecido pelo avesso, dobre os retângulos ao meio em seu comprimento e costure-os (à mão ou na máquina). Para um acabamento melhor, utilize linha de uma cor semelhante à do tecido.
Vire o tecido para o lado certo, dobre cerca de 0,5cm para dentro e dê um ponto de costura nas extremidades como mostra a imagem abaixo.
Agora, faça outro ponto de costura, dessa vez unindo as extremidades opostas, de forma que o tecido forme um “x”.
Preencha o interior do tecido com manta acrílica para que assuma o formato da tulipa.
Para fechar, dobre o tecido cerca de 0,5cm para dentro e costure como na imagem abaixo.
Antes de arrematar, introduza o palito de madeira recoberto por tecido ou papel verde.
Para que o palito fica mais firme e não se solte, coloque um pouquinho de cola branca.
A tulipa está pronta! Para fixá-la ao laço do bem casado, utilize cola quente.

Os meus bem casados foram encomendados na Eleonora Galvão e, com ela, funcionou assim: levei as tulipas com antecedência e ela já me entregou os bem casados montados, sem taxa adicional.

segunda-feira, 16 de abril de 2012


How-Tuesday: Tiny House Wedding Favors

In this DIY project Mel Stringer and Maddy Young, you’ll learn how to make your own tiny town of cozy paper houses. Use them to decorate a wedding celebration as customized place cards, clustered together as a centerpiece, or as party favors filled with a secret surprise. We’ve also included  free PDF templates in four colorways which you can print out, fold up, and wow your guests.
Hi, I’m Mel Stringer, and I’m a zine maker and illustrator for Frankie Magazine. I find such joy in paper craft — so much so that I recently decided to collaborate with fellow artist Maddy Young to create these simple little paper houses, using her illustrations as my guiding light. Her drawings are full to the brim with thin windows, scalloped roofing, closed doors and leading ladders: definitely characteristics you romanticize when envisioning your dream home.
Just imagine these sturdy symbols of love, family, security and warmth decorating guests’ tables at the next wedding you attend. You might even find a tonne of confetti stuffed inside, a secret thank-you note, or a sweet treat to take home with you.

You Will Need:
A design template: redpinkbluesky blue.
Scissors
Quick-drying glue (I recommend something like Selleys Kwik Grip)
Ruler
Bone folder or butter knife
Medium-sized paintbrush (for applying the glue)
PDF instructions
Directions:


1. After you have downloaded and printed the design template of your choice (links above in the supply list), score along the dotted lines with a bone folder (or butter knife) and a ruler applying light pressure. (Scoring like this allows for easy and clean folds and tabs later on).

2. Carefully cut out the house template using the scissors.


3. Start folding along the dotted lines until every tab and fold has been creased.

4. Start by applying glue to the tabs on the base of the house. Attach these tabs to the side walls to begin constructing the house.


5. The roof is a little bit more fiddly that the base, but have patience (and that quick-drying glue like I mentioned earlier!) and begin to carefully glue the tabs of the roof together. Rely on your intuition when it comes to this part; in essence, it’s like putting together a box.

Optional:
• Using an Exacto knife or pen knife and carefully cut out the windows of the house before folding to give the house little open windows!
• If you cut little windows into the house, you could insert a battery-operated tealight (or any sort of battery-operated light) to use the house as a small lantern decoration.
• By leaving the top flap of the roof unglued, you can easily pop goodies inside the house that can be closed and opened by your recipient!
• Consider writing your guests’ names on the back of the house (which has been purposely left blank) to use them as placeholders. Writing any other sort of name or message in that space is also an option.

Thank you to Mel Stringer and Maddy Young for sharing this project with us. If you make your own paper house party favors, share a photo with us in the Etsy Labs Flickr group.


sábado, 14 de abril de 2012

marcador de pagina

ares that compose an L shape.
3) Using your ruler, draw a diagonal line across the uppermost square, from its top right corner to its bottom left corner. Scribble out the upper left half (now a triangle) of the square, as you won’t be using that part.
Next, draw a diagonal line across the bottom right square, from its top right corner to its bottom left corner. Scribble out the lower right half (now a triangle) of this square.
4) Cut out all parts of the entire shape that have not been scribbled out. This should be a square with two triangles attached to it, one on the top and one on the right. This is your template.
5) Trace your template onto your pretty piece of cardstock (or onto the plain piece of cardstock that you intend to decorate), and cut the shape out.
6) Using your ruler and the tip of your mechanical pencil with no lead showing, score a line (make an indent) along the edges of the square that connect to the two triangles.
  • 6.5) [optional] Cut a square of pretty paper slightly smaller than the one you used for your template and glue it onto the square portion of your shape. I generally do this if the paper I’m using is quite plain.
7) Fold one triangle inwards, so it covers the upper half of the square.
8) Apply glue to the underside (the side still facing up) of the second triangle, and fold it over onto the first triangle.
  • 8.5) [optional] As in step 6.5, if you’ve used plain cardstock and want to glue fancy paper on top of it, cut out a triangle of the fancy paper that’s slightly smaller than the folded-over triangles of the bookmark. Glue the smaller triangle on top of the larger, folded-over ones.
9) Add any decorations or illustrations you wish. Use by slipping over the corner of the page you wish to mark, like a pocket.