
sábado, 30 de junho de 2012
tiara mais facil
Instructions for a 6-strand Flat Braid
This is essentially a 6-strand expansion of 5-strand flat braid #2. I have included two differnt methods of making this braid. The appearance of the braid is different in the two methods I have shown, but by varying the way the braid is tightened, both methods can produce both appearances.
Method #1
This method is similar to the methods for both 4-strand flat braid #1, and 5 strand flat braid #2. It is a good method to use with flat materials like leather lace or coreless parachute cord.

To begin, hold the 6 strands so that three are in each hand.

The outside right strand is the first to be moved. Bring it over the middle right hand strand, under the inside right hand strand, and transfer it to the right hand, as shown by the blue arrow.

Here you can see that the strand has been crossed. There are now two right hand strands and four left hand strands.

Now it is the outside left strand that will be moved. Bring that strand under the adjacent strand, over the next strand, and under the inside left strand. Tranfer it to the right hand.

Here the second step is shown completed. Note that there are again three strands in each hand. One cycle of the braid has been completed.

These two steps can be continued for any desired length. Here you can see what the Braid looks like after several cylcles have been finished. If this braid is not made with flat material (as in these pictures) it takes a little extra work to adjust the tightness of the strands if the braid is to look even. This braid in this form will tend to develop a natural twist.
Method #2
This method is essentially 6 strand finger weaving. With finger weaving, each strand acts as both warp and weft at different times.

To start, hold 5 strands in the right hand. With the left hand, weave the other strand through the five strands going over-under-over-under-over as shown by the blue arrow. It is as though the 5 strands are warp, and the other is the weft.

Here the strand has been woven through.

The strand that is on the far left will now act like a weft strand. Bring it through the middle four strands going over-under-over-under.

The first weft strand will now become a warp strand. Simply bring it under the last weft strand and alongside the other warp strands as shown.

Here you can see that the first weft strand is now a warp strand.

Now the strands must be tightened. Make sure that the weft strand in the right hand is pulled tighter than the other strands. This will cause the other strands to be close together as in the picture.

The process of taking the far left warp strand, weaving it through as a weft strand, and bringing the previous weft strand under it to rejoin the other warps is repeated for the length of the braid. Here you can see what that looks like.

This is what the back side of the braid looks like.
tiara
Six Strands - Braided Headband

The only problem with most of the one's I see in the shops is that they look like someone started a sweater and gave up at the rib!
This one should dispense with any such suspicions.
Like most people, I had a bit of apprehension as to whether I could braid 6 strands or not. Once I got into to it and saw the pattern developing, I found that it is so easy that I could just as easily have used 7, 8,10, or 20 strands!
I have included some photos of how I did it and you very quickly see the pattern develop. If you have any questions, feel free to ask.
Pattern for Six Strands (extra detailed Tutorial HERE)
Total length 56cm x 7.5cm / 22" x 3"
Yarn: Yarn: Pierrot Yarn Soft Merino Fingering in colours Ivory,Light Blue, and Cobalt Green
Total weight of finished headband is 49g / 204 m of Soft Merino Fingering.
Six Strands -approx. 110" cm / 43" x 1.25cm / 0.5"
Gauge :5 stitches would give the width of the band.
Cast on 9 stitches: 5 main bed and 4 ribber with waste yarn and do the perfect selvedge.
Knitting in the round and T.5 knit until desired length and take off with waste yarn.
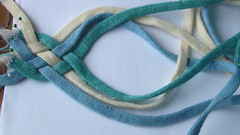
Repeat this twice for each colour giving you 6 strands.
Pin them on a sheet of paper on a cushion and continue as follows in these photos:
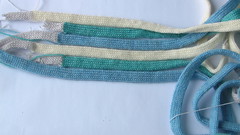
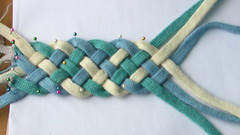

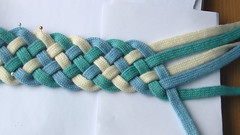
Cables and braids have one thing in common, they form perfect rings if you have them the right length. Measure the headband on your head, without stretching it, and see if it is long enough or too long. Too much can be ravelled back.
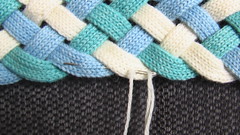

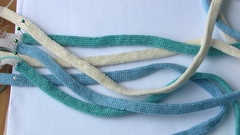
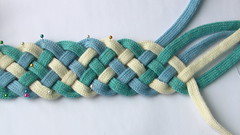
I took a long strand of the natural colour and backstitched it through all the strands from start to finish at the back (the top of the photo).
A backstitch on every cable ensures that the headband keeps it's correct length when it's worn. Then I decided to go the whole way, and sew the bands together from the back as you see in the photo.
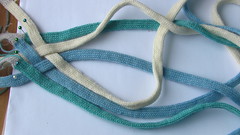
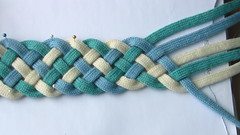
At the join in the back, when you are joining the end of one band to the corresponding start band in the same colour, you don't need to graft. Just be sure to place the join behind another band. I found it easiest to pin the band to the back of another band and ravel back to where the pin was. Cut the yarn and just thread it through the stitches and fasten them with backstitch to the back of the band covering it.
Note: If you start each of the bands at a slightly different place, then the joins can be staggered over an inch or two, helping to make it completely invisible.
For a warmer headband, of if you really don't want to start stitching the back, it could easily be attached to another piece of band 22" long, and knit in the same way as the others.
I don't recommend using material for this, as a headband should have some stretch to hold it on.
Holder for Charging Cell Phone (made from lotion bottle)
My husband and I both have cell phones. And both of us have phone chargers. And that means lots of obnoxious cords. You never know when one of us may be moving phone cords around, to give our phones an extra charge while we’re chatting away……… or trying to charge our phones up before running errands or something. Needless to say, those phone cords seem to be everywhere…..and are generally in the way and hanging all over the floor.
(Okay, and how about when you’re in a hotel or visiting family/friends. There’s never a perfect place to rest your phone while it’s charging.)
I was looking around on the internet for a solution and found this. But I read some reviews and some were saying that the platform was unstable. So I thought a holder that was more cup shape would work much better. But then I wasn’t sure how I was going to sew some plastic into a cup shape. And that’s when I decided to use what I have and cut an old baby lotion bottle into the shape I needed.
It made the perfect little holder for my cell phone while it’s being charged.

And no more phone hanging down from the outlet while in this room or that room……..the cord and phone are now up off the ground, and tucked away into the little holder, while the phone drinks up a full charge.

And of course I couldn’t just leave the poor little holder alone……I had to Mod Podge some fabric right onto it for some kick. Hey, when my cell phone is happy, then I’m happy.

If you look closely, you can see that the orange print is fabric. There are edges of fabric along the bottom and then one line down the back where the fabric met up. But hardly noticeable while in use. (For a few more options……you could also spray paint it, then stencil it or use vinyl cut outs over the paint. That would be cute too.)

And my favorite part, is that I didn’t have to buy a thing. The entire holder was made from things I had on hand.
And turns out, it’s pretty useful. And not one bit of an eyesore.

Would you like to make your own Cell Phone Holder?
First of all, take a look around your house? Do you have any old plastic bottles that are just about empty? A lotion bottle, a mustard bottle, a hairspray or shampoo bottle? Whatever you choose, find one that’s more flattened rather than a circular bottle. The flattened shape will keep the bottle closer to the wall and out of the way once a cell phone is placed inside.
Now, measure your cell phone against the bottle, to be sure the bottle isn’t too big or too small.
I found that this bottle of baby lotion was the perfect size for my iphone. So I washed this out with hot water and let it air dry.

Then I held my phone up to the bottle, starting at the bottom…..and decided how high I wanted the front of the holder to be. Then I made a line with a pen across the front at that point. Then I turned the bottle around and continued the line to the back but curved the back upwards.

I cut the bottle out with some kitchen scissors but a box cutter (or exacto knife) would work too. I just have more control with scissors…….so I used them for this part. I cut along the line until I was left with my phone holder shape.

Then, I drew a curved box shape on the upper back of the bottle. Then I cut it out. (What worked best for me was using a box cutter/exacto knife with a cutting board underneath. This helped my control a ton.) Then I used sand paper to smooth out all of the edges.

Like I mentioned above……you could now try spray paining and adding vinyl or stenciling it to finish your look. Do whatever is best for you.
But here’s how I added the fabric:
First, you want to sand the surface of the whole thing. This will really help to rough it up so that the Mod Podge will stick really well in the next steps. Also, I didn’t want that blue ink to show through from the other side, so I sanded most of the lettering off too. Worked great.

Then, I cut a piece of fabric that was big enough to wrap around the phone holder and was also an inch or two taller on the top and bottom.

Then, I turned the phone holder with the front facing me, and applied a generous layer of Mod Podge to the front.

Next, place the fabric right on top, centering it where it needs to go.

Then, apply more Mod Podge around the side of the container and continue to lay the fabric down right against it, pulling tightly as you wrap. Also, be sure to pull the fabric down around the curve of the bottom of your bottle, if needs be. This will help keep the fabric flat and smooth. Use plenty of Mod Podge to aide you in this process.

When you get to the back, overlap one of the edges over the other. Make sure the fabric is smooth all the way around the bottle……and then cut a straight line up the back of the container, trimming off the excess fabric.

Then trim around the entire container, cutting off the fabric nice and close to the edge. Now, apply a nice thick layer of Mod Podge over all of the fabric. Be sure and seal around all of the edges of fabric with the Mod Podge, ensuring that the fabric won’t peel off.

Lastly, cut an oval shape (or whatever shape applies to you) to fit the bottom of the bottle. Place a layer of Mod Podge on the bottom of the bottom, place the oval shape on the bottom, then apply another coat of the Mod Podge. Now set it upside down on something tall and slender and that your container can fit on top of, so that it can dry without touching anything. (That’s a single flower vase that I’m using.)

Once it’s dry, use a box cutter/exacto knife to cut out the square-ish opening. You’ll probably need to apply more Mod Podge around the opening and allow it to dry again.

Now, don’t worry if your edges aren’t smooth and have little pieces of fabric sticking off. Use your box cutter/exacto knife and run the blade right along the edge of the phone holder all the way around, to remove any stray threads or chunks of dried Mod Podge.

And that’s it. Your phone holder is ready for use.
http://www.makeit-loveit.com/2011/06/stuffed-fabric-turtles-with-pattern-pieces.html
 JUN032011
Stuffed Fabric Turtles (with pattern pieces)
We were shopping around, down in Florida, after we went to the zoo several weeks ago
(yes, in Jacksonville…..some of you asked)……..and we stopped by a Pottery Barn Kids store.
I’m a window shopper. Well, and an inspiration-seeker shopper.
I love walking around and daring myself to find something I want to make. Ha.
Want to go shopping with me?
I might drive you crazy.
Then you and my husband will have something in common.
While we were there…..we saw some cute little stuffed turtles.
So I snapped a picture with my phone, and I decided to try and figure it out at home.
So, here’s my version…..a bit different, but just as sweet.

They are soft and plump and are perfect for little hands.

…..and the tail may be my favorite part.

After making one, you better let your turtle explore outside.


Would you like to make your own?
Turtle pattern pieces found here. (print off and cut out)
Cut out all of your turtle pieces, in whatever fabric and color choices you want.
(You don’t want to use a stretchy fabric, or the turtle won’t hold its shape very well.)
If you want to make your turtle all one color or all different colors, it’s up to you.

Now, place 2 of the leg pieces together, with right sides together, and sew up around the outer edges, leaving the top straight edge open. Do the same with the other legs pieces, making 4 legs. Now, do the same thing with your head and tail pieces.

Next, turn all of these pieces right side out, using a pencil or a paintbrush end to help you poke them right side out.

Now, fill each piece with some stuffing (I used polyester fiberfill)……..using something like the end of a paintbrush helps to shove that batting into those small pieces.

Then sew each piece closed, about a 1/4 inch from the end.

Now, sew 2 of your shell pieces together along one side (with right sides together) and then sew the other 2 together. (Make sure that the shell pieces are right side up while sewing together, or the sides won’t match. The black dot on the shell pattern piece is the top of the shell.)

When sewing the 2 shell pieces together, start at the top of the shell (where the big circle is on the pattern piece) and go down along the one side. Be sure to start right at the center of the top of the triangle piece….don’t cross that imaginary line down the center.

Then, open up the shell pieces. These are going to be on the sides of your turtle.
Now grab one of the side sections and pin your head to the front end with the raw edges matching up. Place it about a 1/2 inch from the bottom of the shell. Then place the tail at the other end, about a 1/2 inch from the bottom as well. Sew the head and tail in place, about a 1/4 inch from the edge.

Then place the other side of the shell right on top, with right sides together. Sew from the center top, down one side……then start at the top again and sew down the other end.
Turn the shell right side out and it should look like this.

Flatten the shell down flat, then start pinning the feet to the shell. Center each foot at the center edge of each shell section. Sew each foot in place, using a 1/4 inch seam allowance. (Add a little sewing tag at this point too, if you have one.)

Then turn your shell inside out and place right on top of the circle turtle bottom (that’s right side up). Pin all the way around the turtle, attaching the shell to the bottom.

Then sew all the way around the base of the turtle, using a 1/4 inch seam allowance…..and leaving about a 3 inch opening along one side, between two of the side legs.

Next, turn the turtle right side out and begin shoving it full of your stuffing (I used polyester fiberfill)…

**When shoving your stuffing in, you’ll need to shove in enough to really expand the shell.
If you don’t have enough, it won’t round out……….but if you shove in too much, it will be too lumpy.
Really move the stuffing around and smooth it out as you’re filling it up.**
Then tuck your raw ends towards the inside, and use a blind stitch to sew your turtle closed. (Need help with the blind stitch? Click here.)

Now, that’s it.
You’re turtle is complete.
Now make several more and create a turtle family……or give each and every one away.
Because what child wouldn’t love a new little turtle friend?!!
Enjoy.
Assinar:
Postagens (Atom)